Happy Teachers Day to all my teachers. Today we mothers surprised our children's class teacher , Sutapa by presenting this handmade scrapbook and a yummy cake.
Hi Friends,
Teachers play a vital role in shaping ones future and there can be no better Teachers day gift than a growing plant in a pot full of gratitude and respect, handmade.
This is an air purifying spider plant which has been transformed into a beautiful Teacher's day gift.
Here is another variation to the same project:
Let me know which one you like most by commenting in the comments section.Thanks!
Hi Friends,
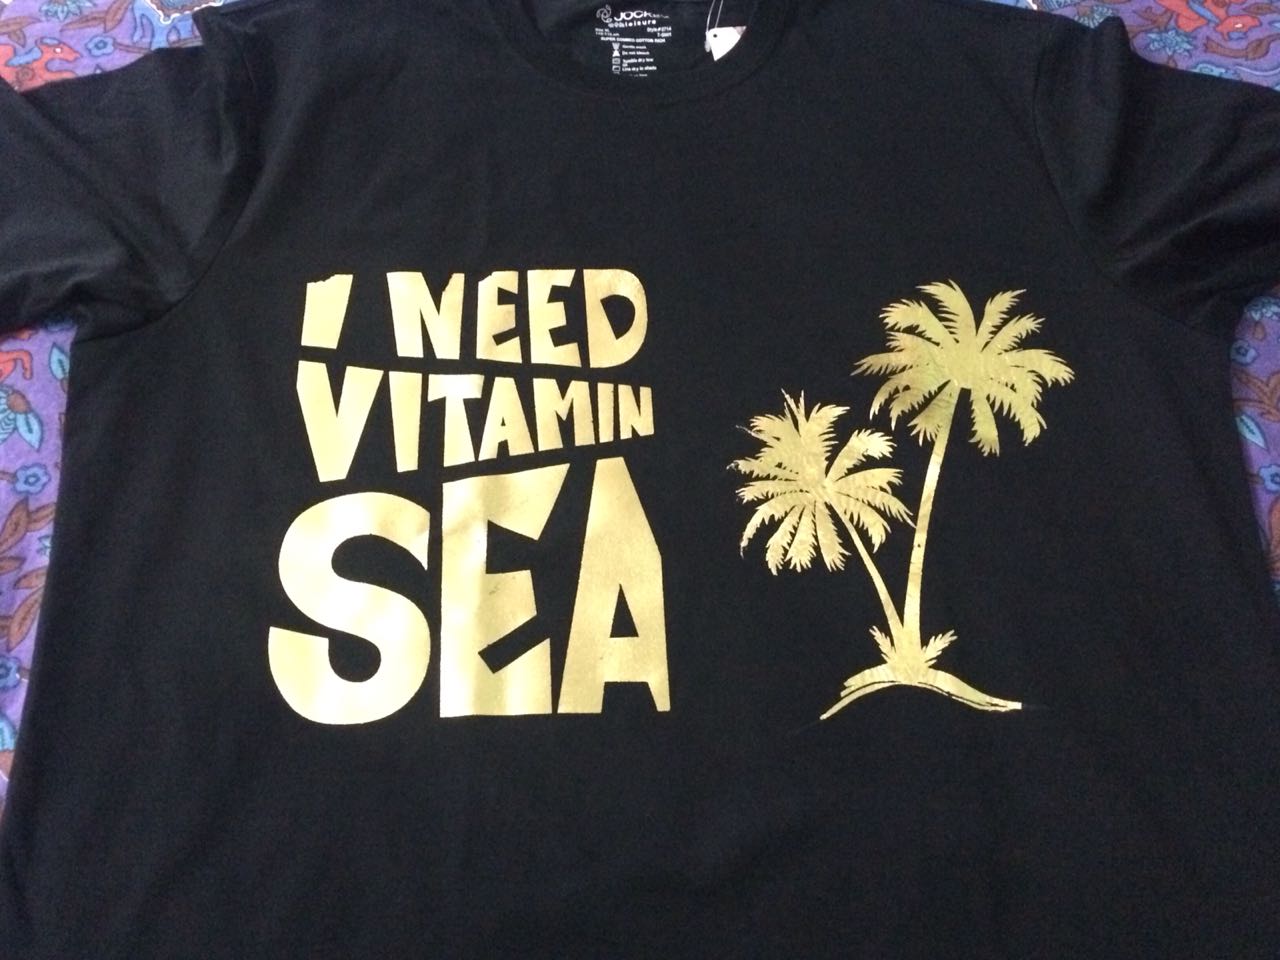
How are you this morning? Today I am going to share with you a unique project I completed lately.
This is a T-shirt I decorated with DMC metal leaf Fabric transfer stickers.
These stickers are very simple to use. Hope you like this project. Thanks for stopping by!
Hi my friends,
Hope you had fun with your best friends yesterday :) Today I am back with a new kind of altered project. Before:
After:
On the base, give a thin coat of gesso. Then a coat of White chalk paint acrylic color. Decoupage the car tissue. Some stenciling using stone effect stencil by Tim Holtz. Paste die cut sentiment - Little Star and glittered R. Paste the photo and the photoframe. Paste flower and leaves after die cutting using floral thinlet die by Tim Holtz. Pour Clear Resin to seal everything and give a glossy finish.
Hi my crafty friends,
Today I am here to showcase five different styles of Rakhis I made for my weekend workshop with kids. Hope you like these. Quilled Rakhi :
Kids Rakhi:
Anchor thread Rakhi:
Vintage bracelet Rakhi:
Peacock Mould Rakhi:
Thanks for stopping by! hope you got inspired to make your known rakhis this year for your darling brothers :)
Hello dear visitors,
Today I am sharing a little brag book and a matching box , created using graphic 45 Once upon a Time Spring Collection. The paper is absolutely great for making albums, embellishments and journaling books. It is also good for making quick presents projects.
I first created a brag book with dimension 5*7 inches. Then I created a chipboard box with dimension 5.5*7.7 inches.
In the collection there were two pages with this same book image. So I used one on the cover page and fuzzy cut the images from the other one. Distress all the images using Vintage brown DI. Added glitter using glitter pen. Paste all the fuzzy cut images on the original images using foam tape to give the dimension.
Hope you can see the glitter and the dimension in these images. Die cut a circle using vellum and paste the frame which is available in the sticker sheet that comes with the collection. Use black thin elastic to make a belly band for the book.
Embellish the brag book using metal charms on the corners of the book.
A pocket on the back side of the book to hold journaling tags. These comes with the collection itself.
Embellish the ribbon using small die cuts from the collection and pearls. I am really happy with the outcome. Hope you like it too :)