Saturday, 7 November 2020

Decoupage Candles - Simple DIY

 Welcome to a fun DIY!

Decoupage is an art form I’m really getting into at the moment. I have posted decoupage DIY tutorials before, and I thoroughly enjoyed them! You can cover pretty much anything in sheets of gorgeous design – if you have the right glue and a bit of patience, of course. So I thought to myself, how difficult are DIY decoupage candles?

We’ve all seen them at the craft fairs. They look absolutely gorgeous, but also a bit expensive to buy. While I would love to have one of these in every room of my house, I just couldn’t afford to keep it up. So… yup, you guessed it, let’s make them ourselves!!!

I used the heat method to stick the napkin to the candle. I used an old Iron for this purpose. First cut out the tissue paper of the required size. Keep the napkin on the candle and slowly rub the iron on the napkin. you will observe that it will stick to the surface of the candle. cut the extra paper if there is any.
It can be a little bit tricky method but I am sure you gonna love the results!


Wooden Tissue Box Holder

 Hi! Today I am back with a different kind of project. It’s a lovely MDF Tissue Box Holder for your desk/ Kitchen/ Washroom/ Utility that you will use daily to keep your wipes. You can decorate a Wooden Tissue Box Holder to bring you joy when you look at it!!! I made two MDF Tissue Box Holders.

Take a plain wooden Tissue Box Holder from any craft store. Apply a thin layer of gesso to prime it. Decoupage the top of the box with your choice of tissue paper. Apply acrylic paint at the bottom part. Also Make a thin border of some contrasting color. it will help in highlighting the colors of the decoupaged tissue paper. Mostly two coating will be needed of the acrylic color.


Apply 2-3 Coats of Varnish and Voila !! its Done !!

I made one more similar MDF tissue Box holder.


Hope you get inspired !!

Friday, 6 November 2020

Upcycle Old Rusty Frying Pan DIY

 Hi Friends, Hope you all are doing well!

Today I will be using my old frying pan which was almost waste and I was about to throw it , but then suddenly I got the idea of... Explore. DIY And Crafts. DIY Projects. I decoupaged it and turned it into a Kitchen Décor. 


This was my pan whose ceramic coating was ruined.  
First Gesso the whole surface. Paste your Tissue using decoupage glue. Apply yellow acrylic paint on the edges and handle. Apply 2-3 coats of Varnish. Decorate with Flowers and Ribbons and Voila !! Its Done !!

My five year old son also upcycled one small pan using  a car tissue paper.

 This is a very easy method of recycling rusty old pans and Try making something creative out of them them. Hope you like my project ! thanks :) :)

Friday, 12 June 2020

Glow Jar - Aeroplane theme - DIY Kids Project

Hi Friends Welcome back,
Today I am showcasing a my kids DIY project. He made a glow jar.


You will need:
Glass Jar with lid, Die cuts, Modge Podge, Glitter, embellishments, twine, battery operated Candle.

First clean the jar and paste die cuts in it using Modge Podge. Once dry apply a coat of Modge Podge inside the jar and sprinkle glitter. Now embellish the lid. Put  a candle inside the jar and your Glow in dark jar is ready to go ..

Hope you get inspired :)

Sunday, 7 June 2020

Mosaic on Earthen Pot

Hello my Crafty friends,
I am back with sharing a Mosaic project I did last year but didn't get time to post it, so here I am with my first Mosaic project and believe me its addictive!
All you need is Mosaic tiles , Glue, Grout and Acrylic Colors to color the grout or rest of the pot. I used yellow for grout and Grey for the top border of the pot. Generally we cut manually the ceramic tiles, but Amazon has some pre-cut tiles so I tried my hands on it and here is the result ..


I observed that since it is an old earthen pot, the Amazon grout developed some cracks in it. I will try doing the technique on other surfaces and will share my observations ...
Thanks!

Saturday, 25 April 2020

Makeover of Wooden Chowki - Decoupage

Hi Friends,
I am back with a decoupage project. This is my old Chowki which was wearing out from some places. So I thought of a makeover! Browsed my stash and got these coaster decoupage papers. I layered them on the surface and got this look!


 This was the old Chowki.
First through a sand paper scrub the whole surface. Paint 2 layers of Gesso primer. Scrub the surface again to smooth it out. Now layer the decoupage papers. Using Glue paste them. A coat of decoupage is required after it is dry. Now paint the rest of the body through white acrylic paint. Once dry give 2-3 coats of varnish and its done!!!
Here is a video
Hope you like the project! Thanks.

Thursday, 23 April 2020

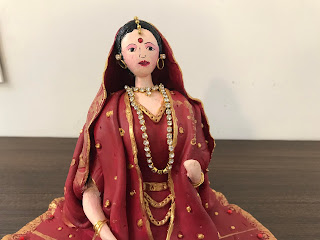
Lagan Parika (ISINABISI) - Clay Modelling Art - Bride Waiting for her Groom :)

Hi Friends,
Hope you all are doing good and optimizing your Lockdown time. Today I am going to share with you a Lagan patrika I made few months back but didnt get the time to share with you all.
In our culture Isinabisi (family Introduction / Lagan patrika) is sent from Bride's family to the Groom's family. It has names of the Bride's parents, family members inviting the Groom and his family to the wedding.
This time i tried my hands on Clay Modelling Art. 

I made a bride using Shilpkar Clay, painted and decorated it. 


From the local market I purchased one wooden board. Painted it using Acrylic colors and did some stenciling. Using a handmade paper i made a scroll and wrote the message using gel pen.

Decorated the platter using a small metal diya. Put the paper scroll and you are done!


 Everyone in the family the project and appreciated the Clay Modelling work. I am so happy with the final result :)